March 6, 2025 - In today’s fast-paced business environment, quick access to relevant documents is crucial for maintaining productivity and efficiency. Whether it is pulling up patient records, project files, or any other document tied to a specific Dynamics 365 record, streamlining this process can save valuable time and reduce frustration.
Part 3 of this blog series provides a guide that will show you how to enhance your Model-Driven App by adding a Command Ribbon Button that allows users to seamlessly open a SharePoint library in a new browser tab. What makes this feature especially powerful is that the library will already be pre-filtered to display only the documents related to the current record in Dynamics 365.
By dynamically generating the SharePoint URL based on the unique identifier (GUID) of the selected record, this feature eliminates the need for manual filtering. Users will be just one click away from viewing the exact documents they need, without having to navigate through unrelated files or perform additional searches.
Understanding SharePoint's URL Filtering
To implement this, it’s essential to understand how SharePoint uses URL parameters to filter records. Follow these steps to familiarize yourself:
- Navigate to the SharePoint library and apply various filters.
- Observe how the URL changes with each filter.
- Take note of parameters like filterValue= and how they correspond to your filtering criteria.
Steps to Create the Command Bar Button
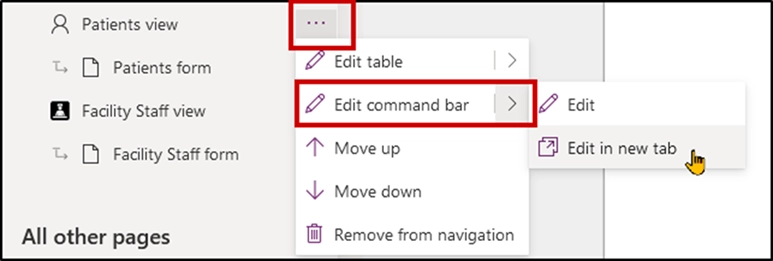
Step 1: Open the Model-Driven App Editor
Access the Model-Driven App Editor and open the command bar editor for the primary record’s main form.
Step 2: Create a new button
- Add a new button to the command bar.
- Label it “SharePoint” for clarity.
Step 3: Set up Power Fx code for the button
Use Power Fx to configure the button's behavior. This code will go into the button’s OnSelect property.
Power Fx code example
Here’s an example of a formula for launching a SharePoint Library:
OnSelect = Launch("https://
What the code does
- Launch(): Opens a new browser tab or window.
- URL Structure: Combines the base URL of your SharePoint library with filtering parameters:
- FilterField1=Patient%5Fx0020%5FGUID: Filters the library based on a column named "Patient GUID."
- FilterValue1=: Specifies the value for filtering.
- &Self.Selected.Item.Contact: Dynamically appends the GUID of the currently selected contact record from the app.
When users click the button, this code opens a new tab with the SharePoint library filtered for documents associated with the current record.
Step 4: Save and Publish
After setting up the Power Fx code, save and publish your changes.
By following this guide, you’ve now empowered your Model-Driven App with a powerful Command Ribbon Button that seamlessly connects Dynamics 365 records to their corresponding SharePoint documents. This feature simplifies the document retrieval process, saving users time and helping them stay focused on their work without unnecessary navigation or manual filtering.
Streamlining document access
This guide demonstrated how to create a Command Ribbon Button in a Model-Driven App to improve document retrieval efficiency. By seamlessly linking Dynamics 365 records to a pre-filtered SharePoint library, users can quickly access relevant documents without the need for manual filtering.
Administrators are encouraged to test the button with different records to ensure functionality and introduce the feature to their team for immediate use. Small enhancements like these significantly improve user experience and operational efficiency. For questions, reach out to your Citrin Cooperman advisor or Andrew Yoder at sales@citrincooperman.com.
Take a look at other articles in this series for other tips and tools:
Related Insights
All InsightsOur specialists are here to help.
Get in touch with a specialist in your industry today.